Upgrading Your ownCloud Server
It is best to keep your ownCloud server upgraded regularly, and to install all point releases and major releases without skipping any of them, as skipping releases increases the risk of errors. Major releases are 6.0, 7.0, and 8.0, and point releases are intermediate releases for each major release. For example, 8.0.1 and 8.0.2 are point releases.
Version numbering changed with ownCloud 8.0. Major releases are now indicated by the second number, so 8.0. 8.1, and 8.2 are major releases. The third number indicates an intermediate release, e.g. 8.0.5.
Note
If you are using the Encryption app and upgrading from older versions of ownCloud to ownCloud 8.0, you must manually migrate your encryption keys with the occ command after the upgrade is complete, like this example for CentOS: sudo -u apache php occ encryption:migrate-keys You must run occ as your HTTP user. See Using the occ Command to learn more about occ
There are multiple ways to keep your ownCloud server upgraded: with the Updater App (Server Edition only), with your Linux package manager, and by manually upgrading. In this chapter you will learn how to keep your ownCloud installation current with your Linux package manager, and by manually upgrading.
(See Upgrading ownCloud with the Updater App to learn about the Updater App.)
Note
Before upgrading to a new major release, always first review any third-party apps you have installed for compatibility with the new ownCloud release. Any apps that are not developed by ownCloud show a 3rd party designation. Install unsupported apps at your own risk. Then, before the upgrade, they must all be disabled. After the upgrade is complete and you are sure they are compatible with the new ownCloud release you may re-enable them.
Preferred Upgrade Method
The best method for keeping ownCloud on Linux servers current is by configuring your system to use the openSUSE Build Service (see Preferred Linux Installation Method); just follow the instructions on oBS for setting up your package manager. Then stay current by using your Linux package manager to upgrade.
Note
Enterprise Subscription customers will use their Enterprise software repositories to install and update their ownCloud installations, rather than the openSUSE Build Service. Please see Installing ownCloud Enterprise Subscription on Linux for more information.
You should always maintain regular backups (see Backing up ownCloud), and make a backup before every upgrade.
When a new ownCloud release is available you will see a yellow banner in your ownCloud Web interface.

Upgrading is disruptive. When you upgrade ownCloud with your Linux package manager, that is just the first step to applying the upgrade. After downloading the new ownCloud packages your session will be interrupted, and you must run the upgrade wizard to complete the upgrade, which is discussed in the next section.
Upgrading With Your Linux Package Manager
When an ownCloud upgrade is available from the openSUSE Build Service repository, you can apply it just like any normal Linux upgrade. For example, on Debian or Ubuntu Linux this is the standard system upgrade command:
$ sudo apt-get update && sudo apt-get upgrade
Or you can upgrade just ownCloud with this command:
$ sudo apt-get update && sudo apt-get install owncloud
On Fedora, CentOS, and Red Hat Linux use yum to see all available updates:
$ yum check-update
You can apply all available updates with this command:
$ sudo yum update
Or update only ownCloud:
$ sudo yum update owncloud
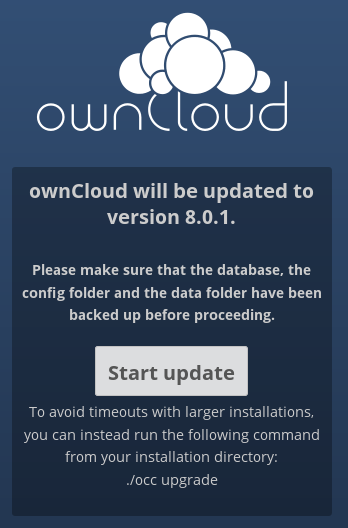
Your Linux package manager only downloads the current ownCloud packages. There is one more step, and that is to run the upgrade wizard to perform the final steps of updating the database and turning off maintenance mode. After using your package manager to install the current ownCloud release, you will see two screens. On the first screen, click the Start Upgrade button, or optionally run the occ upgrade command instead of clicking the button.
occ upgrade is more reliable, especially on installations with large datasets and large numbers of users because it avoids the risk of PHP timeouts.
Note
The occ command does not download ownCloud updates. You must first download the updated code, and then occ performs the final upgrade steps.
The occ command is in your owncloud/ directory. You must run it as your HTTP user. This example is for Debian/Ubuntu:
$ sudo -u www-data php occ upgrade
Before completing the upgrade, ownCloud first runs a simulation by copying all database tables to a temporary directory and then performing the upgrade on them, to ensure that the upgrade will complete correctly. This takes twice as much time, which on large installations can be many hours, so you can omit this step with the --skip-migration-test option:
$ sudo -u www-data php occ upgrade --skip-migration-test
This example is for Fedora, CentOS, and Red Hat Linux:
$ sudo -u apache php occ upgrade
Or:
$ sudo -u apache php occ upgrade -skip-migration-test
- The HTTP user and group in Debian/Ubuntu is www-data.
- The HTTP user and group in Fedora/CentOS/RHEL is apache.
- The HTTP user and group in Arch Linux is http.
- The HTTP user in openSUSE is wwwrun, and the HTTP group is www.
See Using the occ Command to learn more about using the occ command, and see the Setting Strong Directory Permissions section of Installation Wizard to learn how to find your HTTP user.
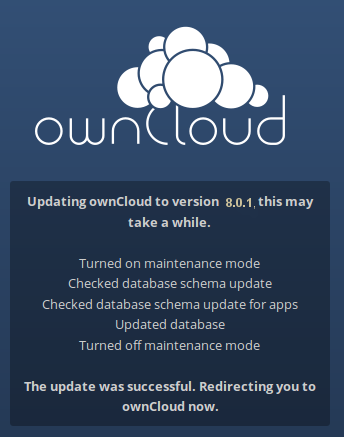
When the upgrade is successful you will see the following screen:
After upgrading, verify that your ownCloud directory permissions are set according to the Setting Strong Directory Permissions section of Installation Wizard.
If the upgrade fails, then you must try a manual upgrade.
Manual Upgrade Procedure
If you are upgrading to a major release, for example from 7.0.5 to 8.0, you must review all third party applications (not core apps), for compatibility with your new ownCloud version. Then disable all of them before starting the upgrade.
Next putting your server in maintenance mode. This prevents new logins, locks the sessions of logged-in users, and displays a status screen so users know what is happening. There are two ways to do this, and the preferred method is to use the occ command, which you must run as your HTTP user. This example is for Ubuntu Linux:
$ sudo -u www-data php occ maintenance:mode --on
Please see Using the occ Command to learn more about occ.
The other way is by entering your config.php file and changing 'maintenance' => false, to 'maintenance' => true,.
- Back up your existing ownCloud Server database, data directory, and config.php file. (See Backing up ownCloud.)
- Download and unpack the latest ownCloud Server release (Archive file) from owncloud.org/install/ into an empty directory outside of your current installation. For example, if your current ownCloud is installed in /var/www/owncloud/ you could create a new directory called /var/www/owncloud2/
- Stop your web server.
Apache 2 is the recommended server for ownCloud (see ownCloud 8.1 Release Notes for recommended setups and supported platforms.)
Operating System Command (as root) CentOS/ Red Hat apachectl stop Debian or Ubuntu /etc/init.d/apache2 stop SUSE Enterprise Linux 11
openSUSE 12.3 and up
/usr/sbin/rcapache2 stop
systemctl stop apache2
Rename or move your current ownCloud directory (named owncloud/ if installed using defaults) to another location.
Unpack your new tarball:
tar xjf owncloud-latest.tar.bz2
This creates a new owncloud/ directory populated with your new server files. Copy this directory and its contents to the original location of your old server, for example /var/www/, so that once again you have /var/www/owncloud .
Copy and paste the config.php file from your old version of ownCloud to your new ownCloud version.
If you keep your data/ directory in your owncloud/ directory, copy it from your old version of ownCloud to the owncloud/ directory of your new ownCloud version. If you keep it outside of owncloud/ then you don’t have to do anything with it, because its location is configured in your original config.php, and none of the upgrade steps touch it.
Note
We recommend storing your data/ directory in a location other than your owncloud/ directory.
- Restart your web server.
Operating System Command (as root) CentOS/ Red Hat apachectl start Debian or Ubuntu /etc/init.d/apache2 start SUSE Enterprise Linux 11
openSUSE 12.3 and up
/usr/sbin/rcapache2 start
systemctl start apache2
Now you should be able to open a Web browser to your ownCloud server and log in as usual. You have a couple more steps to go: You should see a Start Update screen, just like in the Upgrading With Your Linux Package Manager section, above. Review the prerequisites, and if you have followed all the steps click the Start Update button.
If you are running a large installation with a lot of files and users, you should launch the upgrade from the command line using occ to avoid PHP timeouts, like this example on Ubuntu Linux:
$ sudo -u www-data php occ upgrade
Note
The occ command does not download ownCloud updates. You must first download and install the updated code (steps 1-3), and then occ performs the final upgrade steps.
- The upgrade operation takes a few minutes, depending on the size of your installation. When it is finished you will see a success message, or an error message that will tell where it went wrong.
Assuming your upgrade succeeded, take a look at the bottom of your Admin page to verify the version number. Check your other settings to make sure they’re correct. Go to the Apps page and review the core apps to make sure the right ones are enabled. Finally, re-enable your third-party apps.
Setting Strong Permissions
For hardened security we highly recommend setting the permissions on your ownCloud directory as strictly as possible. After upgrading, verify that your ownCloud directory permissions are set according to the Setting Strong Directory Permissions section of Installation Wizard.
Restore From Backup
If you need to reverse your upgrade, see Restoring ownCloud.
Troubleshooting
When upgrading ownCloud and you are running MySQL or MariaDB with binary logging enabled, your upgrade may fail with these errors in your MySQL/MariaDB log:
An unhandled exception has been thrown:
exception 'PDOException' with message 'SQLSTATE[HY000]: General error: 1665
Cannot execute statement: impossible to write to binary log since
BINLOG_FORMAT = STATEMENT and at least one table uses a storage engine limited
to row-based logging. InnoDB is limited to row-logging when transaction
isolation level is READ COMMITTED or READ UNCOMMITTED.'
There are two solutions. One is to disable binary logging. Binary logging records all changes to your database, and how long each change took. The purpose of binary logging is to enable replication and to support backup operations.
The other is to change the BINLOG_FORMAT = STATEMENT in your database configuration file, or possibly in your database startup script, to BINLOG_FORMAT = MIXED. See Overview of the Binary Log and The Binary Log for detailed information.
Occasionally, files do not show up after a upgrade. A rescan of the files can help:
$ sudo -u www-data php console.php files:scan --all
See the owncloud.org support page for further resources for both home and enterprise users.
Sometimes, ownCloud can get stuck in a upgrade. This is usually due to the process taking too long and encountering a time-out. It is recommended to turn off the upgrade and start over with the manual process from the command line as described above under point 12.
Stop the upgrade process this way:
$ sudo -u www-data php occ maintenance:mode --off
And start the manual process:
$ sudo -u www-data php occ upgrade
If this does not work properly, try the repair function:
$ sudo -u www-data php occ maintenance:repair